The water and evenings off Canada’s coast can get chilly. And if you’re planning on camping out for an extended period of time, you’re going to need a way to get warm. That’s where a backcountry hot tub comes in.
It’s cheap, (relatively) simple, can last for a couple of days, and brings some of the creature comforts of home into the wild. Professional surfer and Ambassador Raph Bruhwiler walks us through how he and his family rinse off and warm up after a long day in the northern Pacific Ocean.
Most items we use are easy to come by. The only one that requires more than a quick trip to the hardware store is the fire pit itself. I custom built our current system from an existing pit, welding a copper coil to the inside of it. But you can just place a copper coil on top of your firepit and it will work about the same.
First, you’ll need a wide beach or river front — someplace with a water source (to fill your tub and regulate its temperature) and where the earth is easy to dig, move, and fill back in later on. I try to stay near a freshwater source — typically a creek — as it’s nice to rinse off the salt after a long day of surfing.
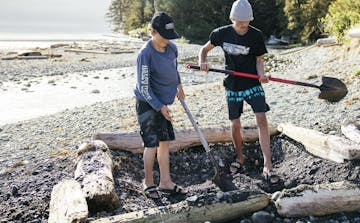
Backcountry hot tubs come in all shapes, sizes, and depths. It’s good to begin with an idea of how many people you’ll need to fit and how deep you want it. I recommend starting with your tarps first: make sure your hole accommodates your tarp measurements. Also, take into account whether you have logs available to outline the tub and use as backrests. With logs, you’ll only need to dig about a foot into the sand. Once you’re sure of the size of your hot tub, secure some logs and lay them out as a rough outline. Here is where you get the kids on shovels to start digging — just be sure they’re digging upwind and a safe distance from the fire. As they’re digging, we’ll occasionally check the depth by having someone sit in the hole and the overall size by laying the tarp out. The tarp should cover the hole and a few inches beyond the outline of the logs. These two tests will save you from having to redo any work later on.
Next, we’ll assemble the core mechanism that will create the “hot” in our hot tub.
We’ve put a lot of time into getting this just right over the years, but now we’ve got it down to a science. Start by hooking up the boat bilge pump to your power source, a fully-charged car battery. Next, connect the bilge pump to a rubber garden hose, using the wrench and hose clamps to avoid any leaks.
Picking up another hose clamp, I connect the end of the hose to a straight piece of copper pipe that leads to the firepit I previously custom-built with copper coils. This is where the water will eventually circulate through, pass by the fire, and heat up. Once I check that both the battery and bilge pump are in working order, I move both next to where the tub is being dug out.
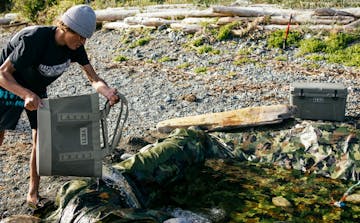
For this step, we need our 8’ x 12’ tarps — ones that are big enough to cover the entire surface area of the fresh-dug hole. I recommend using at least two: the first can be an older tarp that might have some holes but is good for cushion, and a newer, second tarp that won’t leak over time. Laying down additional layers will soften up particularly gravelly spots. It's important to note that we usually need something (or someone) heavy to keep the tarps from blowing away in the wind as we’re laying them out. A couple of rocks or our 12 year-old, Dusty, should work just fine.
Once the tarps are laid and secured, it’s finally time to fill up the tub. Grab a Camino® Carryall and keep pouring until the water is within six to ten inches of the edge of the tarp. As the kids top off the tub, I drop in the hoses and the bilge pump. Then, turn on the bilge pump to get water circulating from the tub to the firepit’s copper coils. I’ve found that both the hoses and pump tend to float, so I suggest securing both with a couple of heavy rocks.
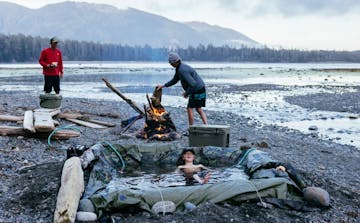
Your fire might be the most important piece of the puzzle. We make sure we gather plenty of small pieces of wood for a steady burn, and then we take turns keeping the fire going. This serves two purposes: you don’t want to be getting out of the warm tub on a chilly evening to find firewood, trust me. Secondly, your fire can double as an area to cook dinner.
Once the tub is nice and hot, we drop in with dinner, drinks, and a great view of the sunset. If it’s a clear enough night, we might stay in it to watch the stars. And when we’re done, we put out the fire and cover it all up with another tarp. This keeps the bugs out so we’re good for another day of rinsing off and warming up post-surf.
For several weeks out of the year, Raph Bruhwiler and his family live on a remote part of Vancouver Island. To see how they make it their home away from home, click here.
WARNING: The content in this article is for informational purposes only. YETI does not make any representation or warranties with respect to the accuracy, applicability, fitness, or completeness of the content or information. The activities described in this article may pose certain risks of personal injury or harm, so any action based on this article is strictly at your own risk.


